Bird Banding is the practice of capturing birds in order to attach bands to their legs for identification purposes, recording data, and then releasing the bird back to the wild.

On Thursday October 8th, I had the privilege of joining Chris Earley and the Lab Studies in Ornithology class for a morning of bird banding! The first thing I got to see was Chris surrounded by ornithology students as he pulled birds out of small, cloth bags for data collection. For each one, he identified (if possible) and recorded the date, the bird’s ID, specie, sex, age, weight, and fat level, as well as any unusual characteristics.

Before you get ahead of yourself, you must record the identification numbers and letters if the bird is a re-capture and give it a new one if it does not have one already. These are read from a silver aluminium band. The date and time of capture must also be recorded. You also must initial your name, so that people know who made a mistake (probably YOU).
In order to band a bird, you must first measure it’s leg size. Chris has a handy dandy measuring device to help him give the bird the right sized band so that it is not too tight, nor too loose. You don’t want it to hurt the bird, but you also don’t want it too fall right off!


Bird banding pliers are used to open the band enough to attach around the leg, and then tightened shut.

Here, Chris is banding a White Throated Sparrow, who has a cute little white patch under his “chin” and a yellow mark between his eye and beak. This bird can have either brown, grey-brown, or red-brown eyes. This species has a light band above the eye which is either white or tan coloured, the white band being more dominant.
The Chickadees, which are a resident bird here at the Arboretum get coloured bands in order for easy identification through binoculars. On this occasion, we skipped identifying the bird’s sex and fat level because you cannot tell what sex a chickadee is unless they are breeding, and the fat level is skipped because they live here and are sufficiently fed (they don’t have to store fat for later!)

This beautiful Chickadee gets some lovely bright coloured bands. The pattern or combination of the bands are marked down on record, reading from top left to bottom right (by left, Chris means the bird’s right leg, so that when it’s standing facing you on a branch, you read it like a book).This may vary depending on the the place it is banded.
Keeping track of all these Chickadees is useful for knowing how old some of them are, which is often difficult to tell. The oldest Chickadee at the Arboretum is at least 7 years old, which is fantastic for a bird that has an average life expectancy of less than 2 years.

Sometimes you can tell how old a bird is by subtle differences in colour or feather quality. Above, Chris is looking at the tail feathers of the White Throated Sparrow to see if they are abraded or not. So, if they look scruffy we can guess the bird’s hatch year: the age of the bird based on the year they were hatched. Another example is in the Hermit Thrush, who’s hatch year is based on plumage:

The wing chord is usually measured to determine if the bird is male or female. For White Throated Sparrows, a wing chord or 60mm or fewer is a female, and 74mm or greater is male.
Here, the wing chord of a Mourning Dove is measured in order to determine it’s sex. However, if this measurement isn’t outside of the unknown interval, Mourning Doves who are male have more blue coloured feathers on their head. (This one is female!)

Look how big it is compared to the tiny Red Breasted Nut Hatch. *simultaneous aww*

Next, in order to check the birds Fat Level, you must blow on the birds chest, belly, and under his wing to see the amount of fat it has – then he gets a number according to a fat level chart.
Here, the lovely Mourning Dove we saw earlier looks slightly embarrassingly at the camera as Chris checks how fat she is:

Finally, the birds are put back into their cloth bags in order to properly weigh them on a digital scale.
Then, they are released! I got to hold and release a White Throated Sparrow, making me the happiest ornithologist ever.

To release the bird, you hold it in one hand using what is called a Bander’s Grip. The other hand is held flat underneath the bird’s feet (NOT shown above…) so that the bird can stand on your hand, then you let go of the bird with your first hand and voila, the bird takes off faster than lightning and flies away.
There are two common ways to hold a bird:
The first is called Bander’s Grip, where two fingers are positioned on either side on it’s head, not too tight, but tightly enough so that the tips of your fingers are close to touch. The bird rests belly up in the palm of your hand, excellent for identification and comfortable handling.

The second is called Photographer’s Grip, where three fingers are used to hold his legs and feet. This is useful to get a beautiful photo of you and your bird as it sits up naturally (shown below). Below is a beautiful Dark Eyed Junco who’s colour ranges from dark grey to black and who’s eye colour varies from redish brown to dark red.

Just when you think you’ve gotten through all the birds, you’re happily mistaken. You go on a couple net runs to check if more birds have been caught in the Mist Net. These are long nets made up of very light, fine mesh that pockets birds that fly into it.

The birds kind of just hang out there until somebody comes to free them, which, depending on how tangled up the bird got, may take quite a while. Although it’s funny when just as your trying to help them out of their tangled mess, they start to chirp at you and move around more! This Ruby Crowned Kinglet awaits assistance. Only males have the red crown, so this one is female!

Not sure if this Hermit Thrush is screaming help me, or don’t help me….

When you untangle a bird, you carefully place it into a cloth pouch using a bander’s grip, then carefully sliding your hand out so that the bird does not find it’s way out following your arm. You then wrap the tie around once, through the loop, and secure.

This takes a lot of concentration and great care to make sure you don’t hurt the bird. Sometimes the bird will get itself caught in many layers of the mesh, just like this Chickadee did.

Just for fun, some ornithologists are holding up bird seed to see if any will land on their hand….none did.

Overall, it was a fantastic morning, even though I had to sprint to my class right after. If you are interested in birds (which you should be), Chris Earley may still be doing weekly bird banding. The Wildlife Club also has bird watching in the morning at the Arboretum, who you can e-mail at wildlife@uoguelph.ca
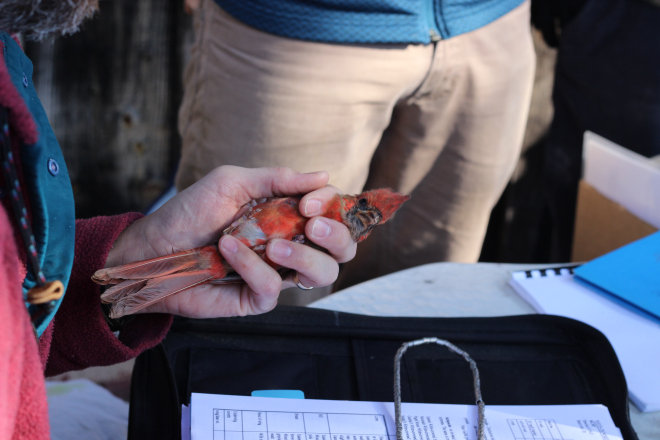
Sorry for the long post, here is a confused Northern Cardinal:

Leave a Reply to guelphoutdoorschool Cancel reply
You must be logged in to post a comment.